Getting Started with HCRpath

What is HCRpath?

Welcome to HCRpath. Our portal provides your practice the ability to streamline operations distributing and organizing your patient’s Annual Wellness Visit (AWV) surveys digitally. Providers and medical staff can help patients complete AWV surveys in person if needed, and then providers can review the answers in our easy-to-use portal before, during and after the patient visit. Once reviewed, Providers have the ability to mark surveys as reviewed, locking the answers and making them ready for another member of the staff to prepare for billing and reimbursement. All members of the staff can easily use HCRpath to keep track of the status of the surveys, from the time they are outstanding to ready for billing.

How to get started

Your Organization or Practice will need to be signed up with HCRpath before you can access the portal. If your organization or practice would like to get a demo of HCRpath, or start using it right away, please contact us at info@hcrpath.com

Site Overview

Below you will find a list of pages included in your HCRpath organization and a summary of features and capabilities within each page:


  1. Organization Dashboard

    1. This is your home page. The Organization Dashboard contains the Provider Table, which will list all of the Providers in your Organization. From here you can invite new providers. 

  2. Staff Page

    1. View and manage all users will Staff-level permission in your organization

  3. Provider Dashboard

    1. View, manage, and access all patients associated with a Provider

  4. Patient Detail Page

    1. View and manage a patient’s information. 

    2. Create and send new surveys 

    3. View and access existing surveys

  5. Survey Detail Page

    1. View and manage information for a single survey within a patient

    2. Edit a submitted survey

    3. Mark a survey as Reviewed

    4. Export or print survey results

    5. Quickly view current medications 

    6. Add and edit patient vitals

    7. Add notes before, during, or after an appointment


Setting Up Your Practice or Organization

  1. Once your organization has decided to use HCRpath, an HCRpath employee will create a new ‘Organization’ which will house all of your providers, staff, and patients.

  2. If you are an admin member, you will receive an invite to the HCRpath portal via the email you provided to HCRpath. 

  3. Via the email, create your new HCRpath account by following the prompts from the email and resetting your password.

  4. You will land on the Organization Dashboard (see example below) where you will be able to view and manage your organization’s information

  5. To add a Staff member, click ‘Staff’ in the navigation and then click ‘Invite Staff’

  6. Enter the name and email of the staff member you wish to invite and repeat as necessary

  7. To add a Provider, click ‘Add Provider’ and follow the prompts to invite the provider by email

  8. Be sure to have the provider’s email address and NPI number as these will be required for invite

  9. Now, add Patients to your providers within your organization

Creating Patients in Your Organization Individual patients are housed within a Provider. Each patient will need to be associated with a Provider.

      1. Click ‘New Patient’ and fill in the fields provided. This is where you will enter the patient’s information regarding identity, contact info, and insurance information.

    1. Save the Patient’s info. You should see the patient appear in the Patients table on the Provider’s page. (If you choose to ‘save and add another,’ your patient will be saved and you will be brought to another new patient screen where you can keep adding patients.

    2. Click on the Patient’s name to view and edit their information, or send a new survey)

Sending a New Survey

  1. To send a new survey to a Patient, navigate to that Patient by clicking into the Provider from your Organization dashboard, then into the Patient’s name from the Patients Table

  1. Click ‘New Survey’ and fill in the prompts to create and send a new survey to this patient

  1. Keep track of the status of the survey by viewing the survey status on the Surveys table in the Patient’s profile


Reviewing a Survey

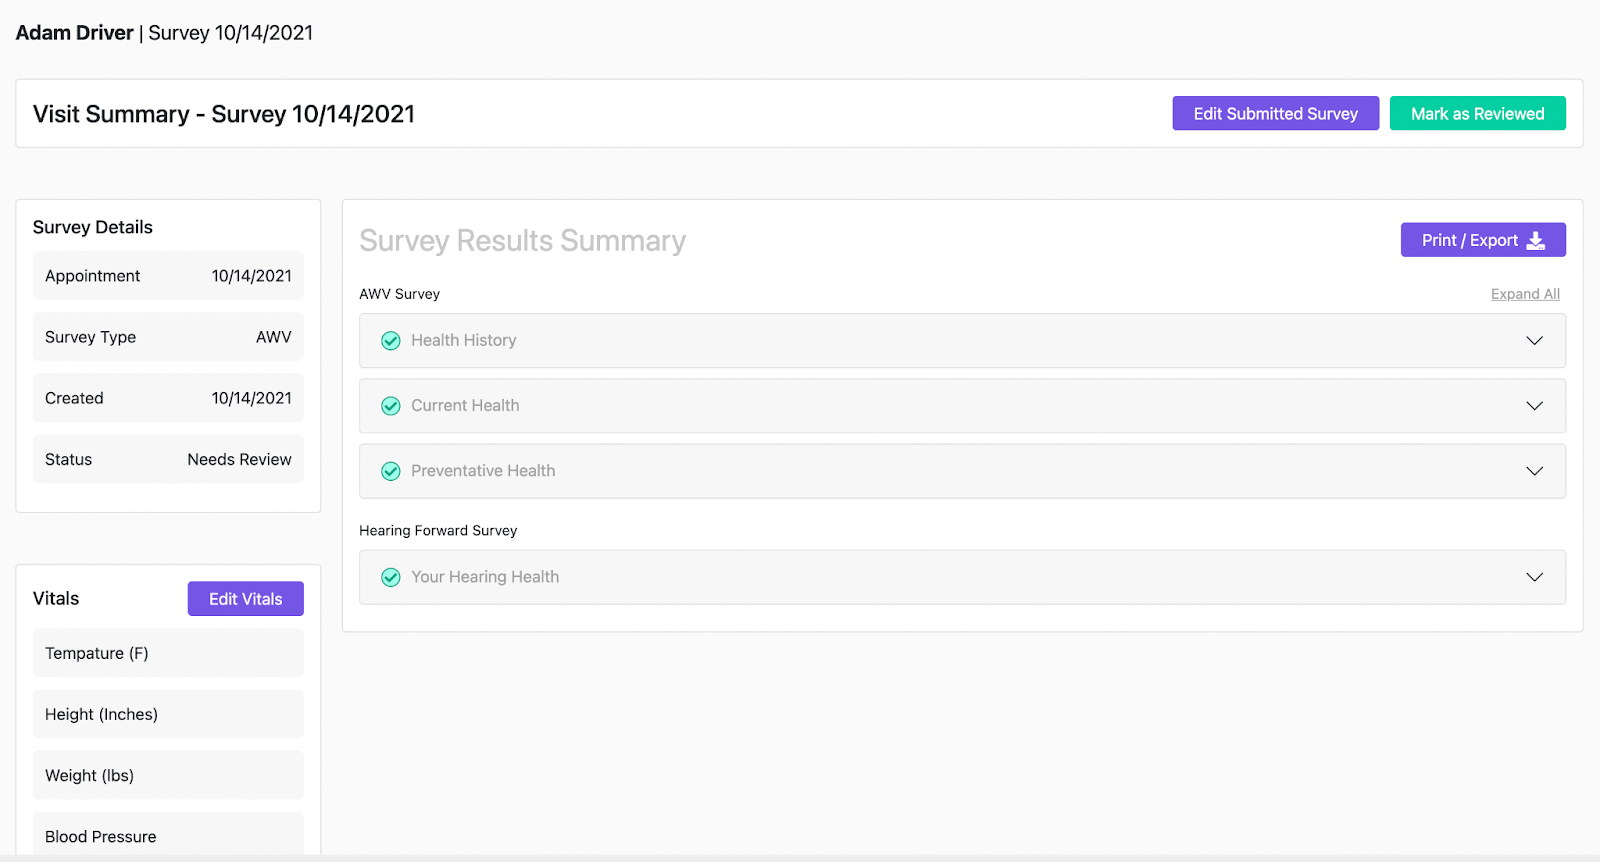
  1. To review a survey that a patient has submitted, navigate to the Patient’s profile and click on the survey you wish to review from the Survey table.

  2. The Survey Detail page will display information about the survey, as well as a summary of the results for easy viewing. 


  1. If you would like to review or edit the survey question by question, simply click ‘Edit Submitted Survey’

  2. Once the results have been reviewed with the patient during the appointment, a Provider may mark the survey as Reviewed. Only Providers are able to do this.


  1. Once a Survey has been reviewed, your office will be able to use it for a Medicare claim. Once your staff has submitted the claim, they can come back and mark the survey as “Billed.” Once the claim is paid, they can mark the survey “Paid”.


Adding Vitals
To add vitals, click into a Survey within a Patient. Once on the Survey Detail page, you will be able to add and edit vitals within the Vitals component on the left-side of the page

Adding Notes To add notes, click into a Survey within a Patient. Once on the Survey Detail page, you will be able to add and edit notes within the Notes component on the left-side of the page


Printing a patient’s survey results

To print a patient’s survey results, click on Print / Export above the Survey Results Summary


Exporting a patient’s survey results to PDF

  1. To export a patient’s survey results, click on Print / Export above the Survey Results Summary

  2. In the Destination dropdown, choose ‘Save as PDF’ and follow the prompts to save to your computer


Sign Up

We look forward to discussing how HCR Path streamlines caregiving for physicians, healthcare providers, and patients.